Part 2: The HTML-document
JavaScript hierarchy
JavaScript organizes all elements on a web-page in a hierarchy. Every element is seen as a object. Each object can have certain properties and methods. With the help of JavaScript you can easily manipulate the objects. For this it is very important to understand the hierarchy of HTML-objects. You will quickly understand how this works with the help of an example. The following code is a simple HTML-page.
<html>
<head>
<title>My homepage
</head>
<body bgcolor=#ffffff>

<center>
<img src="home.gif" name="pic1" width=200 height=100>
</center>

<p>

<form name="myForm">
Name:
<input type="text" name="name" value=""><br>
e-Mail:
<input type="text" name="email" value=""><br><br>
<input type="button" value="Push me" name="myButton" onClick="alert('Yo')">
</form>

<p>
<center>
<img src="ruler.gif" name="pic4" width=300 height=15>
<p>

<a href="http://rummelplatz.uni-mannheim.de/~skoch/">My homepage</a>
</center>

</body>
</html>
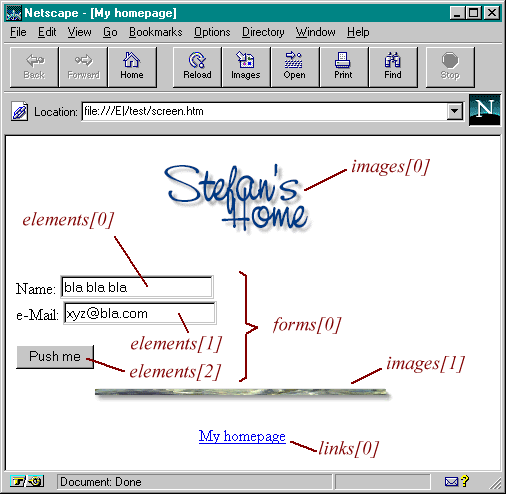
Here is a screenshot of this page (I have added some things with red color):

We have two images, one link and a form with two text fields and a button.
From JavaScript's point of view the browser window is a window-object.
This window-object contains certain elements like the statusbar. Inside a window we
can load a HTML-document (or a file from another type - we will restrict ourselves to
HTML-files for now). This page is a document-object. This means
the document-object represents the HTML-document which is loaded at the moment.
The document-object is a very important object in JavaScript - you will
use it over and over again. Properties of the document-object are for example
the background color of the page. But what is more important is that all
HTML-objects are properties of the document-object. A HTML-object is for
example a link, or a form.
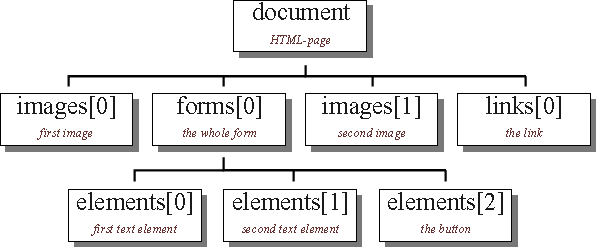
The following image illustrates the hierachy created by our example HTML-page:

We want to be able to get information about the different objects and manipulate
them. For this we must know how to access the different objects. You can see
the name of the objects in the hierarchy. If you now want to know how to address
the first image on the HTML-page you have to look at the hierarchy. You have to
start from the top. The first object is called document. The first image
the page is represented through images[0]. This means that we can access
this object through JavaScript with document.images[0].
If you for example want to know what the user entered into the first form
element you must first think about how to access this object. Again we start
from the top of our hierarchy. Follow the path to the object called
elements[0] - put all the names of the object you pass together. This
means you can access the first textelement through: document.forms[0].elements[0]
But how can we now get to know the entered text? In order to find out which
properties and methods an object offers you have to look into a
JavaScript reference (for example Netscape's documentation or the reference in
my book). There you will see that a textelement has got
the property value. This is the text entered into the textelement. Now
we can read out the value with this line of code:
name= document.forms[0].elements[0].value;The string is stored in the variable name. We can now work with this variable. For example we can create a popup window with alert("Hi " + name). If the input is 'Stefan' the command alert("Hi " + name) will open a popup window with the text 'Hi Stefan'
<form name="myForm">
Name:
<input type="text" name="name" value=""><br>
...
This means that forms[0] is also called myForm. Instead of elements[0] you can use name (as specified with the name-property in the <input> tag). So instead of writing
name= document.forms[0].elements[0].value;we can write the following
name= document.myForm.name.value;This makes it much easier - especially with large pages with many objects. (Please note that you have to keep the same case - this means you cannot write myform instead of myForm)
<form name="myForm">
<input type="text" name="input" value="bla bla bla">
<input type="button" value="Write"
  onClick="document.myForm.input.value= 'Yo!'; ">
I cannot describe every detail here. It gets much clearer if you try to understand the object hierarchy with the help of a JavaScript reference. I have written a small example. There you will see the use of different objects. Try to understand the script with the help of Netscape's documentation - or better: with my JS-book... :-)
Here is the source code:
<html>
<head>
<title>Objects</title>

<script language="JavaScript">
<!-- hide

function first() {

  // creates a popup window with the
  // text which was entered into the text element

  alert("The value of the textelement is: " +
    document.myForm.myText.value);
}

function second() {

  // this function checks the state of the checkbox

  var myString= "The checkbox is ";

  // is checkbox checked or not?
  if (document.myForm.myCheckbox.checked) myString+= "checked"
    else myString+= "not checked";

  // output string
  alert(myString);
}

// -->
</script>
</head>
<body bgcolor=lightblue>

<form name="myForm">
<input type="text" name="myText" value="bla bla bla">
<input type="button" name="button1" value="Button 1"
  onClick="first()">
<br>
<input type="checkbox" name="myCheckbox" CHECKED>
<input type="button" name="button2" value="Button 2"
  onClick="second()">
</form>

<p><br><br>

<script language="JavaScript">
<!-- hide

document.write("The background color is: ");
document.write(document.bgColor + "<br>");

document.write("The text on the second button is: ");
document.write(document.myForm.button2.value);

// -->
</script>

</body>
</html>
The location-object
Besides the window- and document-objects there is another important object:
the location-object. This object represents the address of the loaded
HTML-document. So if you loaded the page http://www.xyz.com/page.html then
location.href is equal to this address.
What is more important is that you can assign new values to location.href. This
button for example loads a new page into the actual window:
<form>
<input type=button value="Yahoo"
  onClick="location.href='http://www.yahoo.com'; ">
</form>
©1996,1997 by Stefan Koch
e-mail:skoch@rumms.uni-mannheim.de
http://rummelplatz.uni-mannheim.de/~skoch/
My JavaScript-book